
Image Segmentation Tools In BioImage Suite Web
The component applications in BioImage Suite Web provide the ability to perform simple image segmentation tasks. We define segmentation here as the creation of a new image whose values (e.g. 0, 1, 2, 3) are labels for specific regions. The output of a segmentation task is used to create an objectmap image that is described in more detail in the Editor tool.
These tools are available both within the standard Orthogonal Viewer and Dual Viewer applications and also in the Editor tool. In the case of the first two applications, the segmentation tools can be accessed from the Segmentation menu. In the case of the editor these can be accessed under the Tools menu.
We recommend that for most applications, you should use these tools within the Editor application unless there is good reason to do otherwise. Some advanced scenarios benefit from the Dual Viewer — especially if no painting/interactive editing needs to be performed.
In addition, given the similarity in workflow between these tools and the image processing tools, we recommend that you reads the document describing the image processing tools prior to continuing with this document.
Tools Summary
In the Orthogonal Viewer Tool these appear as:
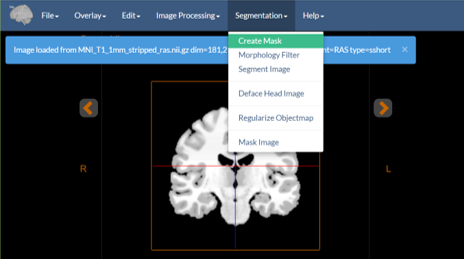
Figure 1: The image processing menu.
These tools perform the following tasks:
- Create Mask — Thresholds binary image mask from the input image using user-specified thresholds.
- Morphology Filter — Perform mathematical morphology operations, e.g. median filter, dilate, erode, seed-based connectivity, on a binary image and output a modified binary image. Many simple segmentation strategies consist of a thresholding operation (
Create Maskin our case) followed by morphology operations to clean up the result. - Segment Image — Performs either k-means clustering or k-means clustering with Markov Random Field smoothing to segment an image into classes. The type of clustering performed depends on the whether smoothness parameter is set to a value greater than zero. For example, this can be used to segment a CT image into bone, tissue, and air; or a stripped MRI brain image, into gray, white, and CSF.
- Deface Head Image — Runs the Deface Image Tool to anonymize a brain MRI image. See the description of this in its own document.
- Regularize Objectmap — Performs an advanced smoothing technique for objectmaps to smooth ragged edges etc. It uses a Markov Random Field prior to create a smoothed version of the existing objectmap.
- Mask Image — Uses an objectmap to mask parts of an underlying image.
Note: All of these modules can be run on the command line as well — see the Command Line Tools document for more information. The modules can also be regression tested (in your own browser) — see the Testing document for more on this.
Using the Tools — Single Viewer Mode
We describe here the usage of these tools within context of the Orthogonal Viewer application, though this is very similar in the other two contexts.
All the tools can be used in the viewer in a very similar manner. They take as their input one of the two images in the viewer — either the image or the overlay — and send their output back to the viewer. In particular, the Create Mask, Segment Image and Deface Head Image tools take as input from imageand store the result in the overlay by default. The Morphology and Regularize Objectmap tools take input from overlay image and output there as well. Finally, Mask Image takes two inputs: the image to be masked from the image and the mask from the overlay and creates an output that is stored in the viewer image.
Just like the Image Processing Tools once selected from the menu, these tools appear in the right sidebar of the application. See the Image Processing document for more details on how modules work.
[BioImage Suite Web Manual Table Of Contents] [BioImage Suite Web Main Page]
This page is part of BioImage Suite Web. We gratefully acknowledge support from the NIH Brain Initiative under grant R24 MH114805 (Papademetris X. and Scheinost D. PIs, Dept. of Radiology and Biomedical Imaging, Yale School of Medicine.)