This document contains developer documentation for BioImage Suite Web.
Programming in JavaScript within the BisWeb JavaScript Environment
This document describes some of the core code in BioImage Suite Web and how to use it for your own JavaScript programming both for your own needs and for extending BioImage Suite Web.
We will first describe two core modules:
js/core/bis_genericio– a set of functions which abstract file input/outputjs/coreweb/bis_webutil– a set of functions for interfacing with the web page
Next we will discuss the core data objects in bisweb which all derive from bisweb_dataobject. This can all be found in js/dataobjects.
- BisWebDataObject (
js/dataobjects/bisweb_dataobject.js) – this is the abstract class from which all other objects derive. - BisWebMatrix (
js/dataobjects/bisweb_matrix.js) – a class for storing 2D float matrices. - BisWebImage (
js/dataobjects/bisweb_image.js) – a class for storing 2D->5D images. This stores both the image data and a NIFTI-1 image header describing the image metadata (orientation etc.) - The transformation classes that derive from BisWebBaseTransformation (
js/dataobjects/bisweb_basetransformation.js).- The linear transformation class
BisWebLinearTransformation– this is used to store the results of linear/affine registrations. - The grid transformation class
BisWebGridTransformation. This is used to store the results of nonlinear (tensor b-spline grid) registrations. - The combo transformation class
BisWebComboTransformation. This stores a combination of a linear transformation and a collection of grids. This is the most common output of a nonlinear image registration as this is often preceeded by a linear transformation - The class
BisWebTransformationCollectionwhich stores arbitrary combinations of transformations (inspired by the VTK class vtkGeneralTransform).
- The linear transformation class
- The collection class
BisWebDataObjectCollection(js/dataobjects/bisweb_dataobjectcollection.js) which stores and serializes a collection ofbisweb_dataobjects.js. It also has some static functions to create any type of BisWebDataObject from a JSON string or file (for de-serialization).
File I/O (core/bis_genericio.js)
Introduction
File I/O in JavaScript is complicated by the fact that it is different depending on whether it is being performed in a web application or a command line/desktop application.
For desktop (Electron) and command line applications, file I/O in JS is very similar to any other language. The only difference is that the bisweb code uses asynchronous file reading and writing which adds a small amount of complexity.
On the other hand, web applications have no way to directly access the filesystem. File input is restricted to files opened by an <input type="file"> element. File output is effectively a download file event. In both cases, only limited information is provided about the system. For example, in file input the system supplies an opaque file handle as input,which does not provide full path information for obvious security reasons.
For file output, all a browser can do is request that a file be downloaded. There is no information as to whether the user pressed cancel or as to what the actual filename was (we can provide an initial filename but the user can change it.) One complication of this is that the hard work of creating the output file has to be done before the filename is requested from the user.
See the following MDN page for more information. Given a file object we can get at least the tail part of the filename using its .name member variable.
Our goal in bisweb is to abstract away these details to enable the programmer to write code that will mostly work in all three contexts. One source of confusion is that in the code you will see comments of the form:
* @param {string} filename - the url or filename or file object
This is because filename may be a string or it may be a FILE object depending on whether we are in command line/desktop or web application mode.
Compressed Files
The Bisweb code can read and write gzipped (.gz) compressed files. This is part of the core dependence on the NIFTI (.nii.gz) as our main image file format. Files ending in .nii.gz will be automatically un-gzipped on file read and filenames ending in .nii.gz will be compressed on file save. A complication is that in web applications we have no way of knowing the final filename. Hence for images changing the extension for .nii.gz to .nii on save will not change the internal compression as this has already been done.
A quick note on Electron
We use Electron for desktop applications. While Electron is essentially built on Node.js, we disable Node.js functionality in the “desktop” application by default to ensure better compatibility of web-based code. However we create back-door (described elsewhere) via the use of a preload file (web/bispreload.js) that provides access to a select subset of node functionality in our web application (See DesktopAppsWithElectron.md for more details.)
To ensure compatibility in Node.js and Electron if using standard Node.js packages like fs, path and os, you should always request these through bis_genericio and not directly.
For example, bisweb never specifies the following (unless the code will only run in command line Node.js applications)
let fs=require('fs');
Instead we access fs as:
let bis_genericio=require('bis_genericio')
let fs=bis_genericio.getfsmodule();
The same applies to the commonly used path, os and glob modules. See the description of bis_genericio next.
The bis_genericio module
This provides the following exported functions.
| Name | Description | Inputs | Return Type |
|---|---|---|---|
| getmode | Returns the environment bisweb is currently running on | none | One of node, browser, or electron |
| getenvironment | Same as above | none | One of node, browser, or electron |
| createBuffer | Creates a Node.js style Buffer from a data stream. Typically invoked from Electron. | Compressed data stream | Node.js Buffer |
| getfsmodule | Provides access to fs from Node and Electron |
none | fs on Node or Electron |
| getpathmodule | Provides access to path from Node and Electron |
none | path on Node or Electron |
| getosmodule | Provides access to os from Node and Electron |
none | os on Node or Electron |
| getglobmodule | Provides access to glob from Node and Electron |
none | glob on Node or Electron |
| tozbase64 | Converts a String to a gzipped base-64 encoded string. Used to encode binary data | String | base-64 encoded gzipped String |
| fromzbase64 | Converts a gzipped base-64 encoded String to a String. Used to decode binary data | base-64 encoded gzipped String | String |
| string2binary | Converts a JS String to a binary String. Needed for integration with the C++/WASM code | JS String | binary String |
| binary2string | Converts a binary String to a JS String | binary String | JS String |
| readtextdatafromurl | Sends a GET request to a given URL and tries to read the response as text data. Calls callback on 200 reply and errorback on any other. | URL, callback, errorback | none (response handled by callback and errorback) |
| readbinarydatafromurl | Sends a GET request to a given URL and tries to read the response as binary data. Calls callback on 200 reply and errorback on any other. | URL, callback, errorback | none (response handled by callback and errorback) |
| readJSON | Invokes read on a url (see section below) and tries to parse the response as JSON. |
URL, data format | JSON parsed data, filename |
| read | See section below | URL, whether data is binary | Data retrieved from URL, filename |
| write | See section below | URL, data, whether data is binary | success or failure |
bis_genericio.read
This function can be used to read files regardless of the context it is called from, i.e. whether it is called from a browser, Node, etc. The reader is encouraged to look through the source code to see the full complexity that this entails. The function takes two arguments:
- url – abstract file handle object
- isbinary – is data binary (false if not specified)
and returns a Promise (see the document AspectsOfJS.md for more information and also this MDN Page. The .then function of the promise has an object with two members, data and filename, that contain the data retrieved from the URL and the filename read from the URL respectively.
Here is an example:
bis_genericio.read(filename,isbinary).then( (obj) => {
    let data=obj.data;
    let filename=obj.filename;
    // do something with this
}).catch( (e) => {
    // handle the error e
});
Note: bis_genericio.read(filename) is the same as bis_genericio.read(filename,false). By default this function will read a text file unless the binary flag is set to true.
bis_genericio.write
This is the complementary function to bis_genericio.read. It takes three arguments
- url – abstract file handle object
- data – the data to save, either a
Stringor aUint8Array - isbinary – is data binary, default=
false
It returns a Promise object which will resolve whether the write succeeded. Here is an example of saving some text in the variable txt to a file handle f.
    bis_genericio.write(f,txt).then( () => {
        console.log('Saved job in',f,'\n',txt);
    });
A Note on Multi-Dimensional Arrays
Many of the core objects below (BisWebImage, BisWebMatrix, BisWebGridTransformation) contain multi-dimensional arrays. These are all stored in 1D TypedArrays (see AspectsofJS.md.) Arrays are indexed using the raster scan scheme, which stores elements as follows:
(row,column) -> row*width+column
This uses ‘row-major’ indexing order, which is the most common order in C/C++. As an aside Fortran uses column-major storage, so any C-code calling Fortran code for matrix operations needs to transpose any matrices at both the input and output stage to convert from row-major to column major mode.
Images in bisweb use five dimensional indexing (i, j, k, frame, component), with corresponding dimensions (width, height, depth, numframes, numcomponents). Here the indexing is:
slicesize = width * height
volumesize = slicesize * depth
framesize = volumesize * numframes
(i, j, k, frame, component) --> i + (j * width) + (k * slicesize) + (frame * volumesize) + (component * framesize)
Confusingly, if thinking of the coordinates in this order, the storage is effectively “column-major”, i.e. the leftmost coordinate (i) iterates first.
BisWebDataObject
All data objects in bisweb derive from BisWebDataObject, which defines the common functionality that all objects implement.
The constructor creates the four shared members with relevant getters and setters:
-
jsonformatname: identifies this type of object in a JSON string (e.g. forBisWebMatrixit is “BisMatrix”). -
filename: Stores the last filename of the object (as a result of it being loaded from/saved to a file.). -
extension: The default filetype the object should be saved as. -
commentlist: AStringarray that contains metadata for the object.
getObjectType function returns a String corresponding to the type of the object (in BisWebMatrix this returns ‘matrix’.) Must be implemented by an inherited class.
    getObjectType() {
        throw new Error('getObjectType not implemented for ' + this.constructor.name);
    }
getDescription provides a short description of the object for user info.
getDescription() { return "Object " + this.constructor.name }
computeHash calculates a hash-string for the data contained in the object for data verification purposes.
computeHash() { return "0000";}
getMemorySize returns the size of the object in bytes.
getMemorySize() { return 0; }
Next are get a set of I/O functions that must be implemented in derived classes:
load defines how the object should be loaded into memory.
    load(fobj) {
        throw new Error('load not implemented for ' + this.constructor.name + ' ' + fobj);
    } `save` defines how the object should be saved to disk.

    save(filename) {
        throw new Error('save not implemented for ' + this.constructor.name + ' ' + filename);
    }
The following two functions handle I/O to and from JSON.
serializeToJSON converts the object to JSON using the built-in JSON.stringify method.
    /** serializes object to json  string
        @returns {String} JSON String
    */
    serializeToJSON(pretty=false) {

        let obj=this.serializeToDictionary();
        if (!pretty)
            return JSON.stringify(obj);
        return JSON.stringify(obj,null,4);

    }
parseFromJson tries to read an object converted by serializeToJSON and parse it into a BisWebDataObject.
    /** parses from JSON
    * @param {String} JSON String
    * @returns {Boolean} true if OK
    */
    parseFromJSON(text) {
        let b;
        try {
            b=JSON.parse(text);
        } catch(e) {
            console.log('Failed to parse text');
            return false;
        }
        if (b.bisformat!==this.jsonformatname)
            return false;
        return this.parseFromDictionary(b);
    }
serializeToDictionary maps a BisWebDataObject to an ordinary JavaScript Object, which can be mapped to JSON. This function should be extended in a derived class with a call to the parent function, i.e. the overwriting function should serialize its own data structures and return super.serializeToDictionary().
    /** serializes object to a javascript dictionary object
        @returns {Object} dictionary containing all key elements
    */
    serializeToDictionary() {
        return {
            bisformat : this.jsonformatname,
            filename : this.filename,
            comments : this.commentlist,
        };
    }
parseFromDictionary is the complement of serializeToDictionary. It takes a dictionary and input and returns a BisWebDataObject. The same proviso to extending serializeToDictionary applies here as well.
    /** parses from Dictionary Object
    * @param {Object} obj -- dictionary object
    * @returns {Boolean} true if OK
    */
    parseFromDictionary(obj) {
        this.commentlist= obj.comments;
        this.filename=obj.filename;
    }
Then come three functions that interface to Web Assembly code packaged in Emscripten Modules. These must be redefined.
serializeWasm Converts a BisWebDataObject into a WebAssemby-compatible binary Array. Must be redefined by any inheritors of BisWebDataObject.
    /** serializes an object to a WASM array
    * @param {EmscriptenModule} Module - the emscripten Module object
    * @returns {Pointer}  -- pointer biswasm serialized array
    */
    serializeWasm(Module) {
        throw new Error('serializeWASM not implemented for '+this.constructor.name+' '+Module);
    }
deserializeWasm converts a WebAssembly binary Array into a BisWebDataObject. Must be redefined by any inheritors of BisWebDataObject.
    /** deserializes an object from WASM array (with an optional second input to help with header stuff)
    * @param {EmscriptenModule} Module - the emscripten Module object
    * @param {Pointer} wasmarr - the unsined char wasm object
    * @param {BisWebDataObject} extra - the extra ``information'' or ``reference'' image (optional)
    */
    deserializeWasm(Module,wasmarr,extra=0) {
        throw new Error('deserializeWASM not implemented for '+this.constructor.name+' '+Module+' '+wasmarr+' ' +extra);
    }
deserializeWasmAndDelete calls deserializeWasm and releases the memory associated with the WASM Array. Unlike the other two WASM functions, this should not be redefined.
    deserializeWasmAndDelete(Module,wasmarr,extra=0) {
        const out=this.deserializeWasm(Module,wasmarr,extra);
        biswasm.release_memory_cpp(Module,wasmarr);
        return out;
    }
compareWithOther exists mainly for internal testing purposes, but is included here for completeness. It tests whether two BisWebDataObjects are of the same type.
    /** compares an object with a peer object of the same class and returns true if similar or false if different
    * @param{BisWebDataObject} other - the other object
    * @param{String} method - the comparison method one of maxabs,ssd,cc etc.
    * @param{Number} threshold - the threshold to use for comparison
    * @returns{Object} - { testresult: true or false, value: comparison value, metric: metric name }
    */
    compareWithOther(other,method="maxabs",threshold=0.01) {
        throw new Error('compareWithOther not implemented for '+this.constructor.name+' '+method+' '+threshold);

    }
These three functions manipulate a BisWebDataObject’s commentlist, and are self-explanatory for the most part. Note the use of Array.slice to create a copy of a JS array.
    /** Adds an element (string or list) to the comment list
        /* @param {String} txt - the element to add
    */
    addComment(txt) { this.commentlist.push(txt); }

    /** Returns a copy of the comment list
        /* @param {array} - a copy of the comment list
    */
    getCommentList() { return this.commentlist.slice(0); }

    /** Sets the the comment list
    /* @param {array} lst - the list to copy
    */
    setCommentList(lst) {
        try {
            this.commentlist = lst.slice(0);
        } catch(e) {
            this.commentlist=[];
            this.commentlist.push(lst);
        }
    }
getDetailedDescription returns an in-depth description of the BisWebDataObject.
    getDetailedDescription(name='') { ... }

}
The module concludes by exporting the BisWebDataObject:
module.exports=BisWebDataObject;
To summarize: the following methods must be redefined in all cases.
getObjectTypeloadsaveserializeToDictionaryparseFromDictionary
The following must be refined if the inheriting object will be an output of a function/module that needs to be regression tested
compareWithOther
The following must be redefined if the object will be used in WebAssembly operations
serializeWasmdeserializeWasm
The following should be redefined to make the object a good citizen of the bisweb ecosystem.
getDescriptioncomputeHashgetMemorySize
The following should not be redefined in any case.
deserializeWasmAndDelete
Any functions not listed here may be extended at the programmer’s discretion.
Note: The constructor of an inheriting class should specify sane defaults for the four base class members. For example, BisWebMatrix’s constructor has the form (in part):
constructor(dtype,inputmat=null) {

    ...
    super();
    this.jsonformatname='BisMatrix';
    this.legacyextension="csv";
    this.extensions=".bismatr";
}
BisWebMatrix
Introduction
This class stores matrices and vectors. The primary use of this class is to store time-series data and connectivity matrices. Time-series data is created by performing VOI-analysis of an image with a parcellation/segmentation map/objectmap image and storing the average of each region in the matrix. In this scenario the matrix rows represent time points and the matrix columns regions. This type of object is the then processed appropriately to compute functional connectivity information.
Connectivity matrices, or “Connectomes”, are square matrices in which the element (row,column) represents the strength of connection, typically correlation, between a row and column.
This class can also be used to store vectors (i.e. 1D matrices).
Relation to Numeric.js
Originally bisweb used Numeric.js style storage for matrices and vectors. This is a powerful library for any numeric operation. After switching to using WebAssembly for more operations, however, bisweb has moved away from Numeric.js.
The BisWebMatrix class still provides functions from mapping back and forth to the 2D JS-style arrays used by Numeric.js, specifically:
getNumericMatrixsetFromNumericMatrix(mat)
File formats
The default file format for matrices is a custom JSON format that stores both the matrix and any associated metadata in the comments field. This is the recommended format. The class can also be serialized/saved and loaded to .csv and the old-style Octave .matr file formats as well. The file format is detected from the extension of the filename specified.
BisWebMatrix objects use the file extension .bismatr by default.
Usage
This code is not worked through in detail for reasons of brevity. Included below are highlights of a few key functions.
To create a BisWebMatrix
const matrix=new BisWebMatrix();
The constructor takes two optional arguments. The first is a String, either “Matrix” or “Vector”, and the second is a 2D Numeric.JS style matrix that is copied internally.
Matrix dimensions are set using the function allocate. The function zero calls allocate with the default value of 0.
allocate(numrows, numcolumns, value=0)
zero(numrows, numcolumns)
One can get/set an individual element using
getElement(row,column)
setElement(row,column,value)
and access the entire 1-D Float32Array (see Raster-scan storage above) using:
getDataArray()
Matrix dimensions are given by:
getDimensions();
To load a Matrix from a file simply use the load function as:
matrix.load(filename).then( () => { })
Similarly for save:
matrix.save(filename)
BisWebImage
BisWebImage is a class that can be used to store and manipulate a 2D to 5D medical image. It stores both the image voxel data and the associated metadata. The metadata contains a full NIFTI header. Some background about medical images is provided to motivate the choices made for BisWebImage.
Image Orientation
3D Medical images are acquired (actually reconstructed) as a set of 2D images stacked along a coordinate axis. The orientation of this “stacking” axis is used to define the orientation of the image as shown in the figure below.
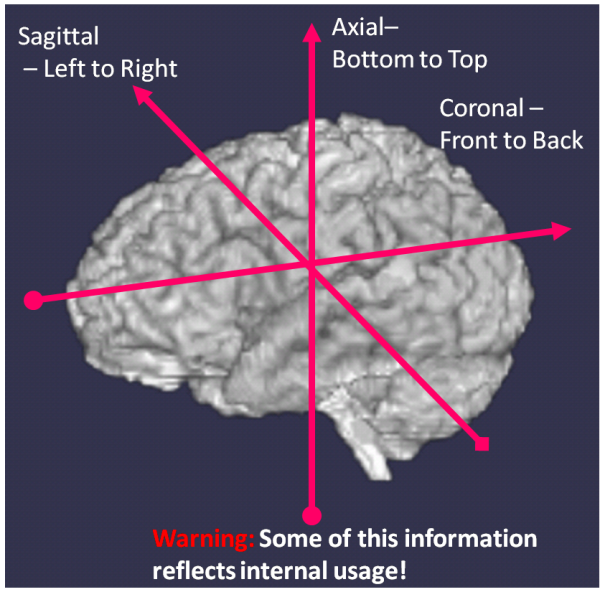
- Axial — the stacking is done along an axis running from the feet to the head, the “axis” of the body.
- Coronal — the stacking is done along an axis going from the front of the body to the back of the body.
- Sagital — the stacking is done along an axis that goes from the left to the right of the body.
- Oblique — the stacking is done in a direction that is not directly aligned with any of the three “axes”. However, oblique slices are often characterized by the orthogonal orientation they resemble, hence you will see terms such as “axial oblique” which means that the slice is close to axial but not completely.
The actual image is an array I(i,j,k) where i, j, and k are internal coordinate axes as follows: (i, j) are the in-plane orientations and k indicates the stacking axis. A common notation used is to define the image orientation by a combination of three letters as reflect the direction of these internal axes when mapped to the physical world. Many common images are labeled as LPS which stands for
- the first letter (L in this case) defines the direction of the i-axis. In this case L is short for “Left” and in this convention specifies that the i-axis points to the left. Low values of i are on the right end of the image and high values of i are on the left side of the image.
- the second letter (P) stands for posterior. This determines the direction of the j-axis which runs anterior to posterior (“front to back”).
- the third letter (S) stands for superior. This determines the direction of the k-axis which runs (in this case) from inferior to superior (“bottom to top”).
Using this convention a coronal acquisition might be labeled as RIP (i: left->Right, j: superior->Inferior, k: anterior->Posterior). Similarly a sagital acquisition might be labeled as (for example) PSR (i: anterior->Posterior, j: inferior->Superior, k: left->Right).
When writing an image viewer one can either try to support all possible orientations or, alternatively, when the image is loaded reorient it (i.e. permute the axis and flip appropriately) to a single orientation (most commonly either LPS or RAS). We will describe this type of usage later.
Voxels and Millimeters
Another important issue is the mapping from physical space to image space. As we noted before an image appears as three-dimensional array I(i, j, k). In some cases such as cardiac imaging, images are acquired as movies and indexed as I(i, j, k, t) where t is time.
Each element of this array has a value which tells us something about the structural, functional or metabolic properties of the tissue that was located at some physical location (x,y,z) at the time of acquisition. (x,y,z) are in scanner coordinates with (0, 0, 0) typically being the center of the scanner’s field of view (e.g. the center of the magnet’s cylinder bore in MRI). Imagining a patient lying on their back on the scanner bed, the physical z axis runs from the feet of the patient to their head, the y axis from the front of the patient to the back and the x-axis from the right of the patient to the left. This convention is the default for DICOM , the clinical medical imaging standard. Hence one can say that DICOM by default uses an LPS convention for (x,y,z). To add confusion here, most research neuroimaging and hence the NIFTI-format that we will use most commonly uses a RAS convention for (x,y,z) (effectively an 180 degree rotation about the z-axis from LPS).
To compute (x, y, z) from (i, j, k) or vice-versa we need two pieces of information:
- (i) the orientation of the image
- (ii) the voxel-spacing.
The voxel-spacing (s_i, s_j, s_k) is the physical distance between two adjacent voxels in the i, j and k image axis respectively. If the voxels are contiguous, i.e. the image is acquired with no gaps, the voxel spacing is equivalent to image resolution (the size of the individual voxels). Combining these two operations yields a 4x4 mapping matrix as follows:
First we convert (i, j, k) to millimeters (mm) as follows:
- I = s_i * i
- J = s_j * j
- K = s_k * k
Then we map (I, J, K) to scanner coordinates (x, y, z) by first creating the 4x1 vector (I, j, K, 1), a.k.a. putting into into “affine coordinates”, and then multiplying this with a 3x4 matrix A of the form
[ r_{11}, r_{12}, r_{13}, t_1 ]
[ r_{21}, r_{22}, r_{23}, t_2 ]
[ r_{31}, r_{32}, r_{33}, t_3 ]
Here the vector [t_1, t_2, t_3] represents the origin of the image and is the position of the first voxel (i.e. i = 0, j = 0, k = 0) in scanner coordinates.
[r_{11},r_{21},r_{31}] is a vector that represents the orientation of the i-axis, the second column [r_{12}, r_{22}, r_{32}] the orientation of the j-axis and similarly the third column [r_{13}, r_{23} , r_{33}] the orientation of the z-axis.
Naturally these two operations can be combined to a single matrix multiplication S = A * B where B is a diagonal 4x4 matrix with elements s_i, s_j, s_k, 1.0.
Hence a typical LPS formated formatted image stored in NIFTI format which was acquired with a spacing of 2x3x4 mm (unusual but possible) and origin (-100,-90,-50) would have a final S matrix as follows:
[ -2.0  0    0 -100 ]
[    0 -3.0  0  -90 ]
[    0  0  4.0  -50 ]
The minus signs in front of 2.0 and 3.0 reflect the mapping from LPS to RAS (flipped x and y).
Storing and Manipulating 3D Images in JavaScript
Elements of an image
An image structure consists of the following parts:
-
An array, typically one-dimensional, storing the pixel intensities
-
The image dimensions, typically an array of the form [width, height, depth]. This may be expanded to include higher dimension information, e.g. number of frames, number of elements per frame in the case of 3D color movies, component, etc.
-
The voxel spacing, which is the distance between two voxels along any given axis. Spacing is often the same as resolution, but the two can be different in certain circumstances.
-
The origin, which is the position in 3D space of the first voxel. Some software defaults to using (0,0,0) for this and not the origin field from the image header.
-
Additional metadata that provides more information about the acquisition parameters, including the orientation, the equipment used, the patient imaged and the physician ordering/supervising the scan.
The amount of metadata is application dependent. In clinical radiology, where images are transmitted/stored using the DICOM file format, images come with extensive metadata, whereas in other applications such as realtime ultrasound to guide a biopsy procedure, there will be almost no metadata at all.
In general, most software stores the core components of the image, intensity array, dimensions, and spacing, and maintains a secondary structure with the remaining metadata for later access as needed.
The NIFTI Header (bis_header.js)
The NifTI File Format
The NIFTI file format is popular for research neuroimaging applications and has become a defacto second standard to DICOM. It has the advantage that it is a relative simple file format consisting of:
- A 348-byte header containing all image metadata
- 4 empty bytes
- Some optional header extensions for additional metadata (often not present) — we will store the text in the commentslist member of
BisWebImageas extensions. - A binary array containing the image intensities appended to the header.
NIFTI images are often saved in files with a .nii/.nii.gz extension, .nii.gz being the gzip-compressed versions. The header is complex structure partly defined in a C include file as:
struct nifti_1_header { /* NIFTI-1 usage         */
    /*************************/
	int   sizeof_hdr;    /*!< MUST be 348           */
	char  data_type[10]; /*!< ++UNUSED++            */
	char  db_name[18];   /*!< ++UNUSED++            */
	int   extents;       /*!< ++UNUSED++            */
	short session_error; /*!< ++UNUSED++            */
	char  regular;       /*!< ++UNUSED++            */
	char  dim_info;      /*!< MRI slice ordering.   */
	short dim[8];        /*!< Data array dimensions.*/
	...
 	char magic[4] ;      /*!< MUST be "ni1\0" or "n+1\0". */
};
Complex Binary Structures in JavaScript
In C/C++, reading this type of structure is trivial, requiring only to define a C struct with the header components in the correct order and calling a single fread.
In JavaScript things are a little more complicated. Bisweb implements this functionality by (i) reading the whole header as
a Uint8Array (i.e. single, unpacked bytes) and (ii) casting portions of it to the appropriate type. (Some this code derives from similar code in XTK.)
For example, to get the image dimensions (dim in the header above), first read the whole header into an array and then cast the appropriate piece of the underlying ArrayBuffer (arr.buffer) to a dimensions array as follows
let dimensions=new Uint16Array(arr.buffer,40,8)
Here the “40” refers to the fact that the dim[8] array starts at a 40 byte offset (count the bytes of the structures before it: int is 4-bytes, short is 2-bytes and char is 1 — adding the sizes of the preceding elements 4+10+18+4+2+1+1 gives 40.)
This sort of functionality is implemented in bisweb in bis_header.js. The reader may consult the source for further reference.
The implementation of BisWebImage
To create a new image, use:
const BisWebImage= require('bisweb_image.js'); // this imports the module

let img=new BisWebImage();
An .nii.gz formatted file is loaded as follows:
img.load('test.nii.gz').then( () => { })
The load function takes an optional second argument forceorient, which will force reorientation of images to a format of the user’s choice. User-preferences are stored in a text file (.bisweb) in the user’s home directory in the case of command line or desktop applications and in the web-browser database for web applications.
The function begins as follows:
load(fobj,forceorient) {

    forceorient = userPreferences.sanitizeOrientationOnLoad(forceorient ||  userPreferences.getImageOrientationOnLoad());
    if (this.debug) {
        console.log('..... forceorient in readbinary=',forceorient);
    }
The argument forceorient can take one of three values:
- None — leave image orientation as is
- RAS — reslice image to be RAS axial
- LPS — reslice image to be LPS axial
If forceorient is not specified then load will default to the user-preferences file to see if the user has specified a global preference.
To save an image call
img.save(filename);
Many processing tasks require cloning an image, i.e. creating a new image similar to an existing image. This operation is performed by the cloneImage method of BisWebImage. The full documentation for this function is reproduced below:
/** clones an image with same changes ... this is not a copy but modifying this image to have similar properties (type, header, etc.) to input
 * @param {BisWebImage} inputimage - the input ``information'' or ``reference'' image.
 * @param {object} opts - the options object -- if not set, this function yields an exact clone
 * @param {string} opts.type - type of image e.g. `short'
 * @param {string} opts.numframes - number of frames in clone (null or 0->same)
 * @param {string} opts.numcomponents - number of components in frame in clone (null or 0->same)
 * @param {array} opts.dimensions - new dimensions (null or 'same' ->same). This can be a 3 or a 4-array to also change frames. opts.numframes overrides this.
 * @param {array} opts.spacing - new spacing (null or 'same' ->same)
 */
cloneImage(inputimage,opts={})
For example, to create an exact copy of an image, i.e. same dimensions and type as current image:
let newimage=new BisWebImage();
newimage.cloneImage(img);
To change the type to float, modify the second line to:
newimage.cloneImage(img, {
        type : 'float'
});
To create a new image with a single frame, e.g. the average frame of a multiframe image:
newimage.cloneImage(img, {
    type : float,
    numframes : 1,
})
The dimensions, spacing, and number of components (5th dimension) may be changed similarly.
createImage is similar to cloneImage in signature and function, but creates a completely new image rather than a copy of an existing one. See the documentation below:
/** creates an image (allocate data etc.)
 * @param {object} opts - the options object -- if not set, this function yields an exact clone
 * @param {string} opts.type - type of image e.g. `short'
 * @param {string} opts.numframes - number of frames in clone (null or 0->1)
 * @param {string} opts.numcomponents - number of components in frame in clone (null or 0->1)
 * @param {array} opts.dimensions - new dimensions (null or 'same' ->[10,10,10]). This can be a 3 or a 4-array or 5-array to also change frames/components. opts.numframes and opts.numcomponents
 overrides this.
 * @param {array} opts.spacing - new spacing (null or 'same' -> [1.0,1.0,1.0])
 * @param {string} opts.orientation - LPS or RAS -- (if not specified, RAS)
 */
createImage(opts={});
To create a 3x4x5 image of resolution 2.0 and type float and orientation ‘LPS’ we type:
let newimg=new BisWebImage();
newimg.createImage( {
    dimensions : [ 3,4,5],
    spacing : [ 2.0,2.0,2.0],
    type : 'float',
    orientation : 'LPS',
});
Other useful functions include:
// Computes the min and max value of the image
getIntensityRange()

/** getRawPixel Data
    @return {TypedArray} -- the raw image data */
getImageData()

/** get Image Dimensions
 * @return {array} image dimensions */
getDimensions()

/** get Image Spacing
 * @return {array} image spacing */
getSpacing();

/** compare dimensions and spacing, return true if same
 * @param{BisWebImage} otherimage - the image to compare to
 * @param{number} threshold - spacing comparison threshold (default=0.001)
 * @param{Boolean} spaceonly - if true (default=false) then only x,y,z dims are compared
 @returns {Boolean} true if this image and other image have same dimensions */
hasSameSizeAndOrientation(otherimage,threshold=0.01,spaceonly=false);
Here is an example, adapted from the module js/modules/mask_image.js, that masks an image given another image. The input is two images input and mask.
First, maskImage check if the two images have the same size. mask only needs match input image in i, j, k — it does not need to have the same number of frames, so the spaceonly argument of hasSameSizeAndOrientation is set to true.
maskImage(input,mask) {}

    if (!input.hasSameSizeAndOrientation(mask,0.01,true))
        return null;
maskImage then gets image dimensions and computes some useful information. If the image is 5D, components are effectively “super frames” in this application and may be treated as frames.
    let dim = input.getDimensions();
    let numvoxels = dim[0] * dim[1] * dim[2];
    let numframes = dim[3] * dim[4];
Next create the output from the existing image.
    let output=new BisWebImage();
    output.cloneImage(input);
Now get the actual data arrays (these are JS TypedArrays).
    let idata=input.getImageData();
    let mdata=mask.getImageData();
    let odata=output.getImageData();
Last, loop through the voxels and either copy the input to the output or set the output to zero depending on whether the mask at this location has value > 0.
    for (let i=0;i<numvoxels;i++) {
        if (mdata[i]>0) {
            for (let f=0;f<numframes;f++) {
               odata[i+f*numvoxels]=idata[i+f*numvoxels];
            }
        } else {
            for (let f=0;f<numframes;f++) {
                odata[i+f*numvoxels]=0;
             }
        }
    }
Return the output image.
    return output;
}
Transformations
These classes provide implementations for linear and nonlinear transformations. These are generated from the image registration code implemented in C++/WASM.
While the JavaScript implementation of the transformation classes can transform coordinates etc., the functionality is mostly leftover from the pre-WebAssembly version of bisweb which used JS-based linear and nonlinear registration code. This functionality mostly unused other than in some regression tests and while it works, its use is not recommended. The primary use of these classes is to implement serialization/deserialization functionality for file I/O and to serve as storage for the “true” implementations, which are on the C++/WebAssembly side.
In reality, unless you are interested in writing new file formats for storing the transformations, or implementing new transformation types, you almost need to know nothing about these classes other than how to load and save them.
Note: Nonlinear interpolation is b-spline on the JavaScript side
File I/O
Most of the registration and image-reslicing code in bisweb takes multiple types of transformations; hence the type of transformation is not known ahead of time, e.g. it could be linear, nonlinear, or combination. The best way to load a transformation is to use the factory methods defined in the module legacy/bis_transformationutil.js. In particular, the key function is:
let xform=bis_transformationutil.loadTransformation=function(filename);
This is a factory function that creates the appropriate transformation class based on the contents of the file.
You can obtain information about the loaded object using its getDescription method and manipulate it using the WASM methods defined in BisWebDataObject, i.e. serializeWasm and deserializeWasm.
The transformation classes support the following file formats:
- Linear Transformation — see
BisWebLinearTransformation.- Either old-style BioImage Suite
.matrfile (4x4 matrix stored as four lines of text) - or a custom JSON format.
- Either old-style BioImage Suite
- Combo Transformation (and Grid Transformation) — see
BisWebGridTransformationandBisWebComboTransformation- Either old-style BioImage Suite
.grdfile - or a new style json format.
- Either old-style BioImage Suite
- Transformation Collection
- Serialized to a custom JSON file.
The .matr and .grd file formats are there for compatibility with the legacy C++ based BioImageSuite tools.
Note: Though bis_transformationutil is located in the legacy folder, it is still very much in use, and you should disregard its placement in this case.
A Note on Combining Transformations and Image Reslicing
Post-multiply
The transformation collection class uses “post-multiply” style combination. Consider the function transformPoint below. The class has a list of transformations (stored in this.transformationsList). These are applied in order as follows:
transformPoint(X, TX) {

  ...

    let tmp = [X[0], X[1], X[2]];
    for (let i = 0; i<this.transformationList.length;i++) {
        this.transformationList.transformPoint(tmp, TX);
        tmp[0] = TX[0];
        tmp[1] = TX[1];
        tmp[2] = TX[2];
    }
If these were all linear transformations represented as 4x4 matrices, i.e. [ A, B, C ], this is equivalent to the following matrix multiplication:
TX = C * B * A * X
where X and TX are 4x1 vectors with their fourth element set to 1.
Image reslicing
Consider two images I(x) and J(x’) and a mapping T that is used to reslice/warp image J to match I. Mathematically, T is the operation that:
T : x -> x'
This means that coordinate wise the mapping goes from I to J. The reslicing operation works as follows:
- Create an empty image that has the same dimensions and resolution as I. Call this J’.
- For each voxel in J’ a. compute its coordinate x. b. Use T to map x to a coordinate in the space of the image J. Call this x’. c. Interpolate image J at location x’ (x’ need not be an integer) and compute the value v d. Set J’(x) = v
This creates the usual saying that coordinates move forward and images move backwards. Reslicing an image J to match an image I requires a transformation from I to J. When computing this transformation in bisweb, I is the reference image and J is the target image. In other software the notation of ‘moving’ and ‘fixed’ is also used.
Consider now the case of an fMRI experiment that maps timeseries data into the space of a reference 3D image, e.g. the MNI template. Here there are potentially 3 transformations
- m1 : from MNI template to the subject’s individual 3D isotropic T1-weighted image
- m2 : from 3D isotropic to thick slice anatomical image acquired on the same slice presciption as the fMRI data
- m3 : from the thick slice anatomical to the fMRI images
To reslice our fMRI data to MNI we combine these in the order m1, m2, m3, i.e. beginning from the reference (MNI) and moving to the target (fMRI).
BisWebDataObjectCollection
This is a class that stores an arbitrary collection of objects of type derived from BisWebDataObject. This is useful for both archiving collections of data and for internal data management.
An example of the use of this object can be found in js/modules/motionCorrection.js. The example below uses a collection to store the motion correction results (matrix) for each frame.
let matrices=new BisWebDataObjectCollection();
Add items as:
matrices.addItem(xform, { "frame": frame});
Retrieve items using (note that frame is an index):
matrices.getItemData(frame)
In general this class stores an array of pairs of data and metadata. Data is of type BisWebDataObject. Metadata can be any simply JavaScript type or dictionary that contains information about the object. A quick look through the core functions illustrates the usage:
setItem(i,obj,extra={}) {
    if (i<0 || i>=this.itemlist.length)
        return;
    this.itemlist[i]={
        data : obj,
        metadata : extra
    };
}

addItem(dataobj,extra={}) {
    this.itemlist.push({
        data : dataobj,
        metadata : extra,
    });
}

removeItem(i) {
    if (i<0 || i>=this.itemlist.length)
        return false;

    this.itemlist.splice(i,1);
    return true;
}

removeAllItems() {
    this.itemlist=[];
}

getItem(i) {
    if (i<0 || i>=this.itemlist.length)
        return null;
    return this.itemlist[i];
}

getItemData(i) {
    if (i<0 || i>=this.itemlist.length)
        return null;
    return this.itemlist[i].data;
}

getItemMetaData(i) {
    if (i<0 || i>=this.itemlist.length)
        return null;
    return this.itemlist[i].metadata;
}
These objects contains some very interesting code for serializing and deserializing arbitrary collections of objects. An interested reader is encouraged to consult the source code.
This page is part of BioImage Suite Web. We gratefully acknowledge support from the NIH Brain Initiative under grant R24 MH114805 (Papademetris X. and Scheinost D. PIs, Dept. of Radiology and Biomedical Imaging, Yale School of Medicine.)