
Advanced Functionality
Application State
Most of the tools in BioImage Suite Web have the ability to save the state of the entire application to a file and read it back in again. For example, in the overlay viewer you can load your data, create your visualizations and then save everything using the option “Save Application State” under the File Menu.
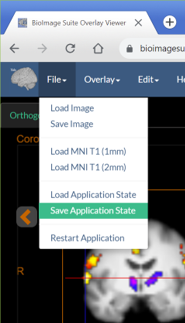
Figure 1: The Save Application State button
This file can then be reloaded later to restore the application. Open the same application and then under the File -> Load Application State to load the file. Your display will repear as it was when you saved it, including thresholds, crosshairs, and other settings.
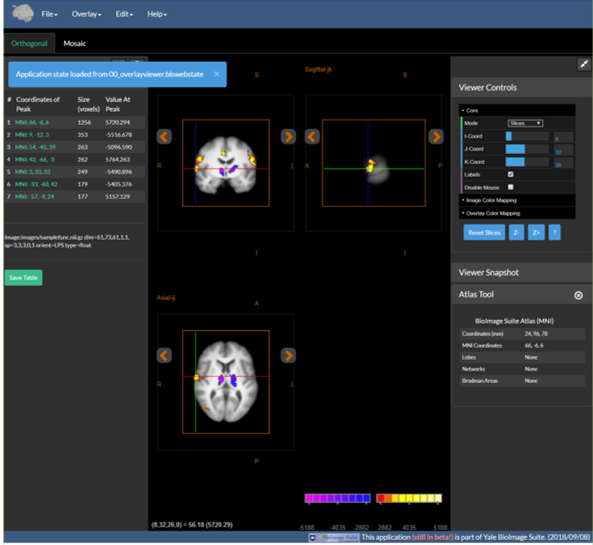
Figure 2: Loading the application state.
The application state can be loaded and saved similarly in other BioImage Suite apps.
Copying and Pasting Viewers
Each application in BioImage Suite has one — or in the case of the Dual Viewer two — viewer components. These can be moved from application to application. For example, open the overlay viewer and load the sample data under the Help menu. (The link given will do both in one go!)
Then under the Edit menu, select the Copy Viewer function. This will store the underlay image, the overlay image, and the viewer configuration (cross hair location, colormaps etc.) in the browser’s cache. You are now ready to paste this into a new viewer.
Then open another viewer, e.g. the Orthogonal Viewer, and under the Edit menu select Paste Viewer. Your viewer state from the other application should now appear in this viewer.
The viewer state clipboard is preserved across sessions unless you clear the Application Cache, assuming that BioImage Suite Web is opened in the same browser.
The dual viewer is much the same — there are two copy and paste options, one for each viewer. Simply choose which one to copy and the perform the same steps as above.
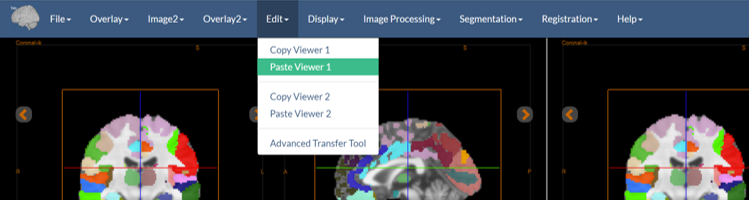 Figure 3: Using the edit menu to paste into Viewer 1 of the dual viewer.
Transfering Images – the Advanced Transfer Tool
In the Viewer and Dual Viewer applications there is a special tool under the Edit menu labeled Advanced Transfer Tool. This is shown below:
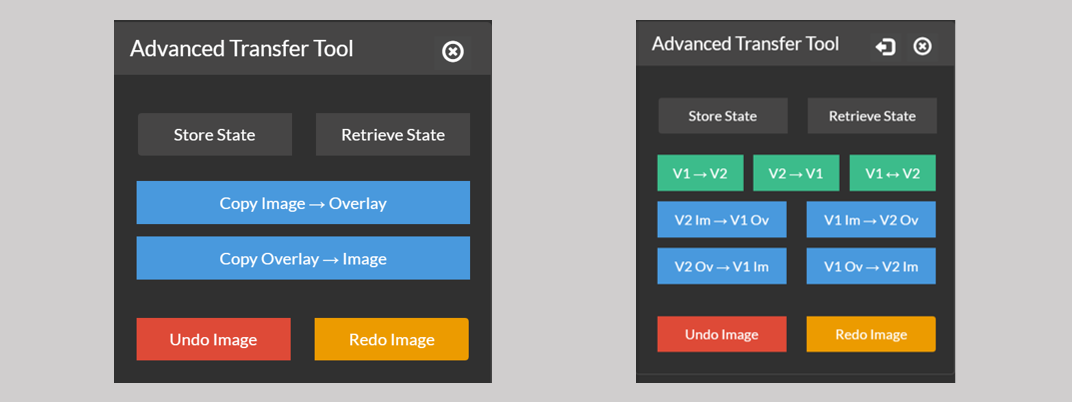 Figure 4: The
 Advanced Transfer Tool menu for the single viewer (left) and dual viewer (right).
This allows the user to copy an image or a whole viewer from one location to another. For example, in the single case we have two options:
Copy Image->Overlay— This will copy the underlay of viewer to the overlay.Copy Overlay->Image— This will copy the overlay of the viewer to the underlay.
The Undo Image and Redo Image options will attempt to undo or redo the last action performed by the transfer tool.
In the dual mode, we can copy whole viewers using the options V1 -> V2, V2 -> V1 or swap them using V1 <-> V2.
The copy function can move between viewers, overlays, or both, e.g. V2 Im -> V1 Ov will copy the image from viewer 1 to the overlay of viewer 2.
Finally, buttons Store State and Retrieve State at the top of the menu can be used to store and retrieve the viewer configuration excluding the images for later use. This allows the user, for example, to store the current cross-hair positions and colormap for use later.
Note: The overlay viewer and editor tools have a simplified version of this tool labeled App State Manager accessible from the Edit menu, which provides subset of the functionality of the advanced transfer tool.
[BioImage Suite Web Manual Table Of Contents] [BioImage Suite Web Main Page]
This page is part of BioImage Suite Web. We gratefully acknowledge support from the NIH Brain Initiative under grant R24 MH114805 (Papademetris X. and Scheinost D. PIs, Dept. of Radiology and Biomedical Imaging, Yale School of Medicine.)